Wear, Dirt and Effect Masks
Wear and dirt on a shape come from its material: add a material in the Shading tab, then turn on its Wear and Dirt sections (see Procedural wear and dirt on a material). You can also bring images into a decal as color or relief, use an image as a mask, and paint by hand where an effect should show.
Image sources
 Import Image, in the Create section (next to Polyline Groove), adds an image as a layer. Pick a file, and the image is packed inside the project so it travels with the decal.
The usage you choose in the file browser decides what the image does:
| Usage | What it does |
|---|---|
| Color + Alpha | Paints the image with an editable tint and opacity. Transparent pixels stay empty and opaque black stays visible |
| Height | Reads a data channel and uses it as relief, scaled by the layer's relief and combined with Add, Cut or Cover |
Imported images keep their aspect ratio. Moving, rotating, scaling, groups, mirror and array modifiers, locks, selection and undo all work on them.
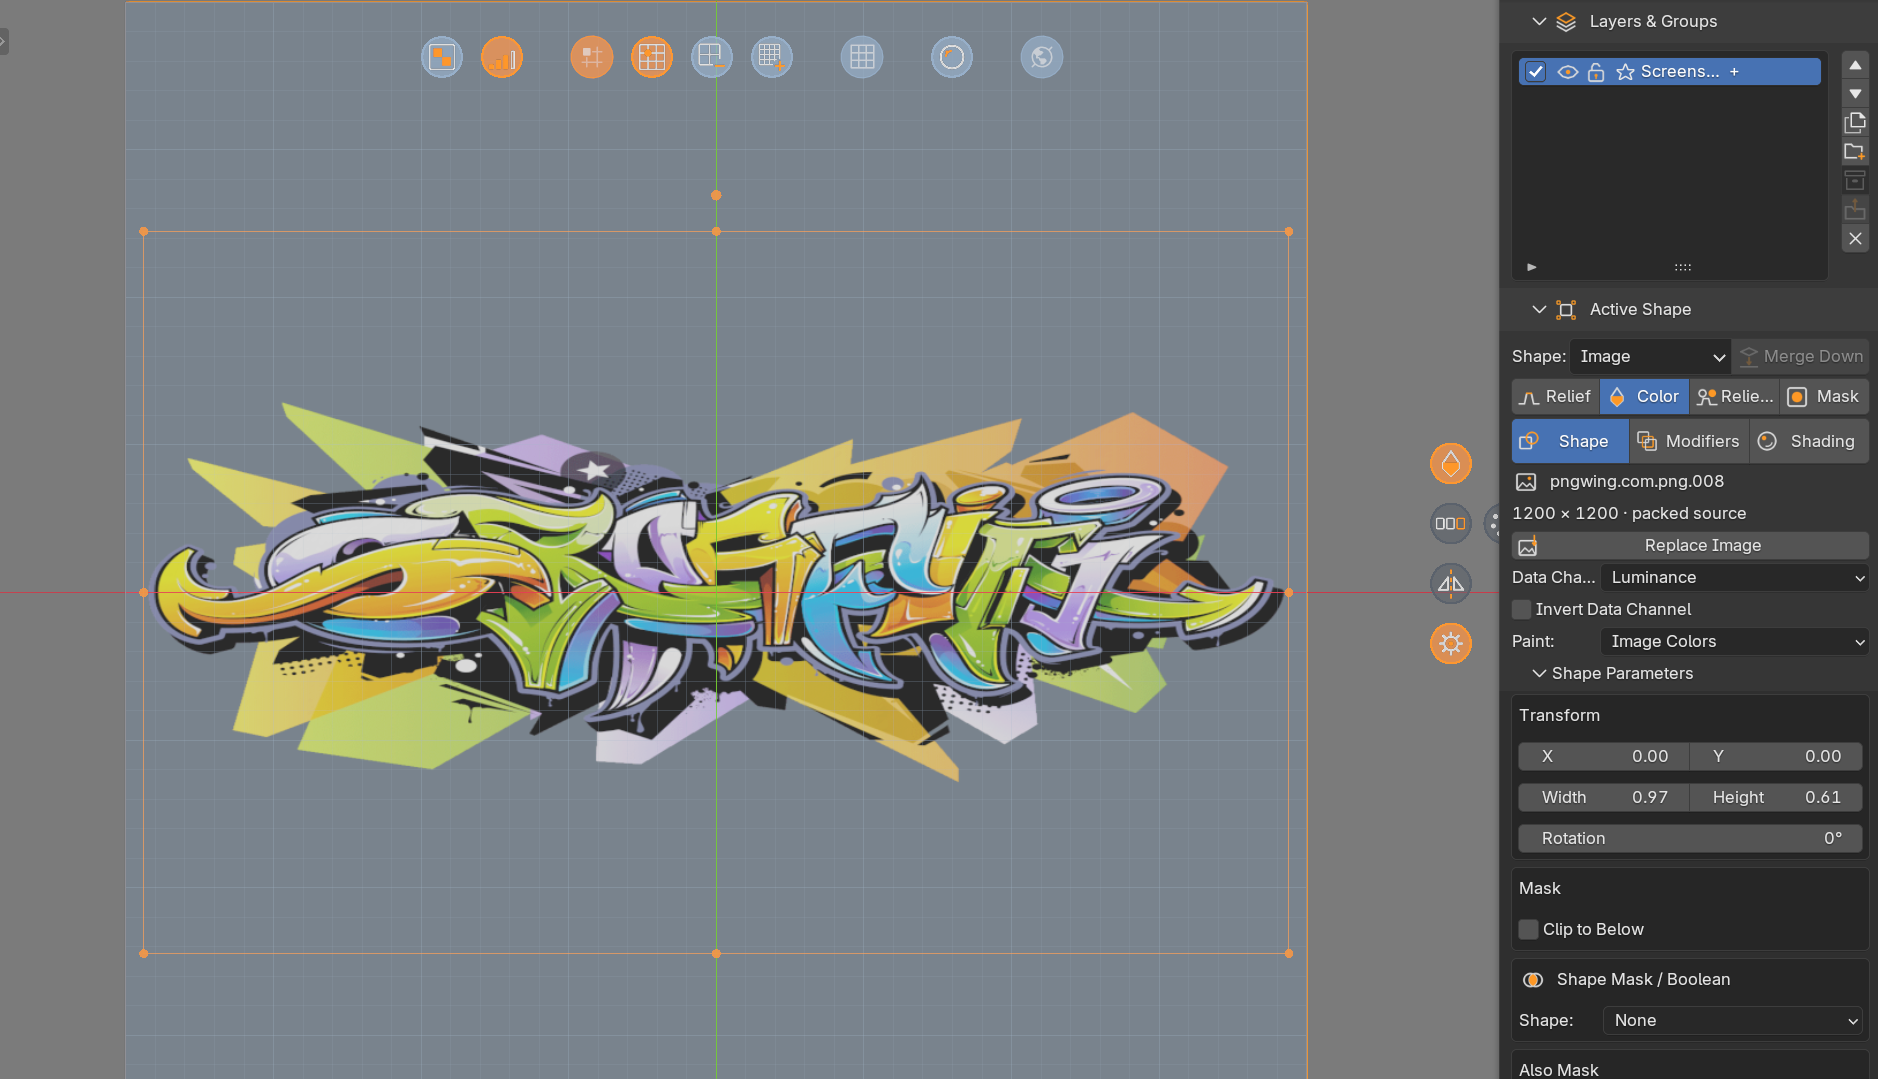
Image settings
| Option | Effect |
|---|---|
| Load Image / Replace Image | Opens the file browser to load or swap the file. The position, size and settings are kept |
| Data Channel | Which channel is read: Luminance, Alpha, Red, Green or Blue |
| Invert Data Channel | Reverses the pattern |
| Paint | Image Colors multiplies the image by the material base color. Tint Pattern uses the base color and reads the image as a density |
Height and mask images are read as raw data, not as colors.
Limits of image layers
Image layers take move, rotate, scale and array or mirror modifiers. They do not take outline or contour effects, and cannot be used as boolean operands. Use a Mask layer with Cut or Keep instead. Each painted image uses one tint slot in the exported materials, while its pixel colors stay in the color map.
Image masks
An image layer can cut other layers, for example to chip a shape with a grayscale pattern. Select the image layer and click Mask in its Use As row.
White removes the most, black removes nothing. The mask and the layers it cuts stay separate layers, both editable.
On the mask layer:
| Option | Effect |
|---|---|
| Mask Effect | Cut removes, Keep reverses the operation. Target Only limits the mask to one shape or group |
| Invert Data Channel | Inverts the pattern |
| Mask Strength | Intensity of the effect |
| Affect | All (relief, color, alpha and materials), Relief (height and normals only) or Color + Alpha (paint opacity and material weights only) |
Relief leaves the paint and the coverage map alone. Color + Alpha leaves the height and the geometric coverage alone, so you can chip only the paint.
An image mask uses its own gray transitions. It does not use the procedural Cut Bevel or contour offsets of shape masks.
Tip
For worn paint or dirt on a shape, the Wear and Dirt sections of its material are quicker: no image to import.
Procedural wear and dirt on a material
Besides images, every material has procedural Wear, Dirt, Scratches and Micro Bump in the Shading tab. See Materials and Finishes.
Each of those sections ends with a Decal Texture box and a Paint Mask row. They apply to the whole decal, whatever the materials.
Decal Texture
A grayscale texture that is added to the procedural effect.
| Option | Effect |
|---|---|
| Image field | The grayscale texture. Its luminance is used |
| Mode | Add, Lighten (keeps the stronger of the two), Multiply (the texture modulates the effect), Subtract |
| Strength | How much the texture counts |
| Scale | Repetitions across the decal |
| Rotation, Offset, Contrast | Placement and contrast of the texture |
| Edges Only | Shows the texture only where the procedural effect already is (not on Micro Bump) |
Paint Mask
A painted mask lets you decide by hand where an effect shows.
How to paint a mask
- In the Wear, Dirt, Scratches or Micro Bump section, click Paint Mask.
- The decal board switches to Texture Paint on a 1024 x 1024 mask, with the view in Solid. A small box in the panel reminds you of the rules.
- Paint on the decal. The preview rebuilds while you paint.
- Click Done.
| Color | Effect |
|---|---|
| Black | Removes the effect |
| White | Keeps the effect |
Press X to swap the brush between black and white.
Done restores your previous mode, view, brush and tool. The same happens if you leave Texture Paint by hand.
Once a mask exists, the row shows Edit Mask (to paint again), Invert (white removes, black keeps) and an X button that removes the mask.
One at a time
Only one mask can be painted at a time. Go back to Object Mode on the decal board first. A message tells you if the mask cannot start.
Wear and dirt in the exported maps
The finish is part of the result: the color, roughness, metallic and normal maps of a saved entry include the wear, dirt, scratches and grain you set, and the placed decal uses them.