Materials and Finishes
Every layer can carry its own color or its own material. This page explains how to paint a layer, give it a Principled material, use the finish presets, save your own materials and paint an outline differently from the inside.
 All of it lives in the Shading tab of the Active Shape (or Active Group) section.
Color or material
The Shading tab starts with a Color section for layers without a material.
| Option | Effect |
|---|---|
| Paint Color | Paints this layer in the color map |
| Color | The paint color |
| Opacity | Strength of the paint |
A layer that is set to Relief only has no paint: tick Paint Color, or switch Use As to Relief + Color or Color, to add a color or a material. Without any material, the layer inherits the scalar values (roughness, metallic) of the mesh it is placed on.
New shapes start neutral
New shapes start with a neutral gray paint, and new materials start white.
Principled material per shape
A material gives a layer its own base color, metallic, roughness and more. Layers sharing one material follow the same edits.
How to give a layer a material
- Select the layer and open the Shading tab.
- In the Shading section, click a name in the Presets list to create a material from that preset. You can also click New next to the material field to start from a neutral gray.
- Edit the values.
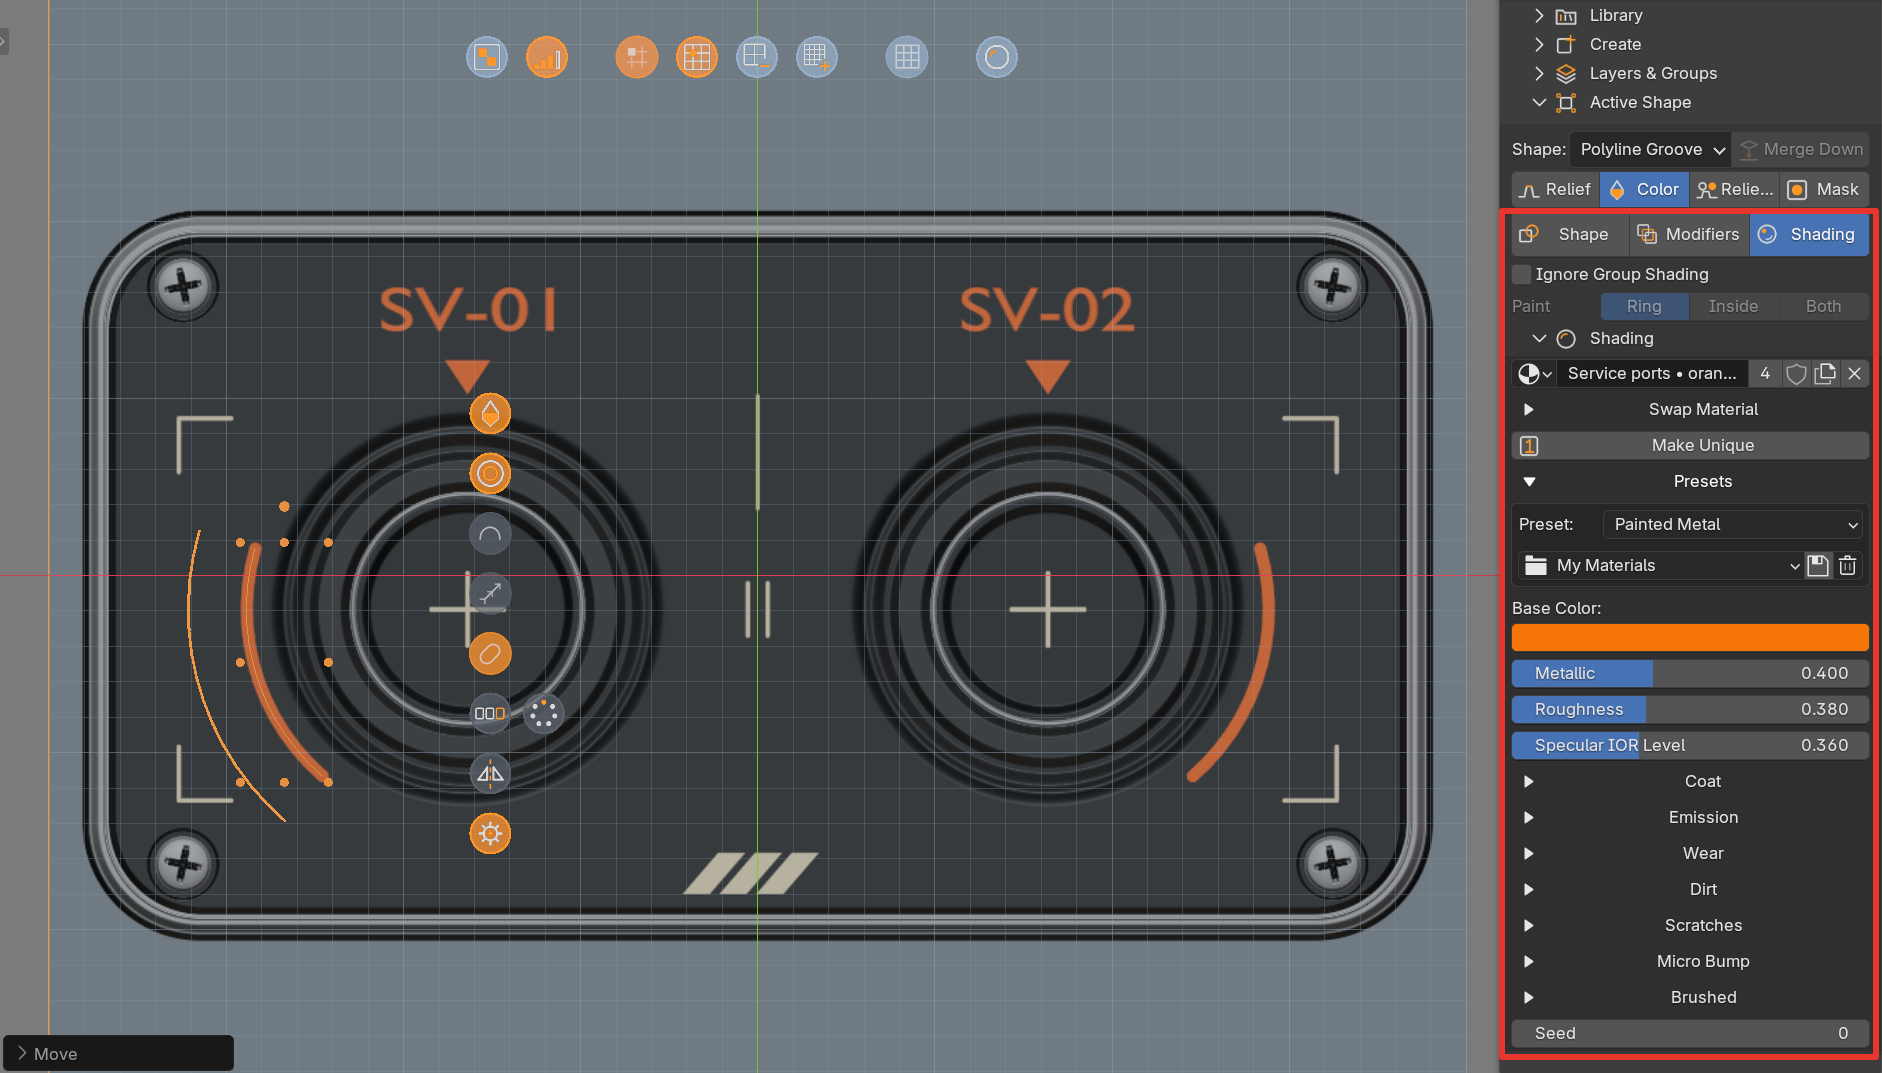
| Control | Effect |
|---|---|
| Material field | Choose an existing compatible material, or click New |
| Swap Material | Opens the preset list again. Choosing a preset creates a new material and leaves other layers that shared the old one untouched |
 Make Unique |
Gives the layer its own copy of the material, so editing it no longer changes the other layers |
The material box then shows:
| Setting | Notes |
|---|---|
| Base Color, Metallic, Roughness, Specular IOR Level | Always visible |
| Coat (foldable) | Coat Weight, Coat Roughness, Coat IOR, Coat Tint |
| Emission (foldable) | Emission Color, Emission Strength. A warning appears if the strength is above zero but the color is black |
What is supported
Materials use constant Principled values. Linked texture graphs, transmission, subsurface, sheen, anisotropy and custom base IOR are not included, and incompatible materials are filtered out of the picker. Use the layer opacity and the decal relief instead of shader Alpha or Normal links.
Color of an image
For an image layer, Image Colors multiplies the image by the base color, while Tint Pattern uses the base color for the pattern. See Wear, Dirt and Effect Masks.
Finish presets
The Presets box holds a Preset drop-down. It sets the material values, and some finishes, in one go.
| Family | Presets |
|---|---|
| Metals | Steel, Aluminium, Chrome, Gold, Copper, Brass, Titanium, Cast Iron, Brushed Metal |
| Painted | Car Paint, Painted Metal, Chipped Paint, Edge Worn Paint |
| Plastics and others | Plastic, Glossy Plastic, Rubber, Ceramic, Concrete, Fabric, Emissive, Varnished Wood, Sticker |
| Custom | Keeps the current values. It is selected automatically when you edit a value by hand |
Presets are a starting point: every value stays editable afterwards.
My Materials
Next to the presets, the My Materials row lets you keep your own materials.
| Control | Effect |
|---|---|
| My Materials menu | Writes a saved material on the active layer. A layer without a material gets a new one. Other layers sharing that material change too |
| Save button | Saves the active layer's material under a name you choose. An existing material of the same name is replaced |
| Trash menu | Deletes a saved material after confirmation. Layers that already use it keep their material |
The My Materials Folder is chosen in the add-on Preferences. In the Presets list, the My Materials drop-down applies a saved material to a new material.
Wear, dirt, scratches, grain and brushed metal
Under the material values, foldable sections add the finish.
| Section | What it does |
|---|---|
| Wear | Wears the paint off convex edges: Amount, Edges Only, Edge Width, Breakup, Softness, Scale, and Exposed Material with a Paint Thickness and an Underlying Material (Color, Metallic, Roughness, Coat Weight, plus a From Preset menu) |
| Dirt | Dirt patches: Amount, Coverage, Contrast, Cavity, Scale, Detail, Detail Scale, Color, Color Noise, Roughness |
| Scratches | Amount, Scale, Length, Width, Density, Angle |
| Micro Bump | Fine grain in the normal map and roughness: Amount, Scale, Frequency |
| Brushed | Striations in the roughness and normal map: Direction (None, Linear X, Linear Y, Circular), Amount, Bump, Scale |
A Seed at the bottom changes the random patterns of wear, dirt, scratches and grain.
Every new material starts with fine scratches, a light dirt layer and a fine grain. Brushed Metal turns on Brushed striations. Chipped Paint and Edge Worn Paint use Wear.
The Wear, Dirt, Scratches and Micro Bump sections also hold a Decal Texture box and a Paint Mask. They are covered in Wear, Dirt and Effect Masks.
Preview each map
Use the channel button of the viewport bar to look at Color, Roughness, Metallic or Normal and see what the finish does. See Relief, Bevel Profiles and Quality.
Group materials and Group Finish
A group can hold a material too. The nearest group with a material supplies every member that has no color or material of its own. A member's own material always wins.
- Ignore Group Shading (on a layer or nested group) refuses what the parent groups would give it.
- A layer that inherits shows Material from group ....
The Group Finish section of a group has one tick per family: Wear, Dirt, Scratches, Micro Bump, Brushed. A ticked family replaces that finish on every member material, with one shared Seed so the details line up across members. Excluded members are listed in the section.
Outline material
When a shape is set to Outline instead of Filled, a Material row decides what the outline paints.
| Choice | Paints |
|---|---|
| Ring | Only the border ring (the stroke, for a path) |
| Inside | The whole interior inside the ring, like a plate distinct from its frame |
| Both | The ring and the interior |
The relief is not changed. The row exists on Panels, Circles, Grooves, Vents and other outlined shapes, and on closed polyline and Bezier outlines. An open path always paints its stroke, like Ring. The row is grayed out until the layer paints something.
The interior painted by Inside or Both is kept in the exported and placed decal.