The Library
The library stores your decals and constructions as small entries with a thumbnail. It is the same block when you place a decal and when you edit one. Each entry keeps the editable layers, so you can open it again at any time.
Where the library lives
The Library section sits at the top of the panel.

| Element | What it does |
|---|---|
| Source buttons | Add-on Library (the decals shipped with the add-on) and one button per User Library you added in the Preferences |
| Folder menu | Filters by folder. All shows every entry, Top Level shows entries outside any folder |
 New folder |
Creates a sub-folder in the browsed folder, and opens it |
 Remove folder |
Deletes the browsed folder. It must be empty |
| Thumbnail grid | Click an entry to choose it |
 Refresh |
Rescans the folders. Use it after copying entries in from outside Blender |
The add-on library comes with ready-made folders such as Screws & Bolts, Recesses, Boxes & Covers, Panels & Hatches, Vents & Grilles, Ports & Sockets, Markings and Junctions. The Junctions folder feeds Junctions.
Add-on library vs User library
You can edit entries of the add-on library and save over them. For your own work, add a User Library folder in the Preferences and keep your decals there: the add-on library may be replaced when you update the add-on.
How to place an entry
- Choose an entry in the library.
- Select a mesh in Object Mode.
- Click Place on Surface.
See Place on Surface.
Buttons for the chosen entry
The column beside the thumbnail acts on the entry you selected.
| Button | Action |
|---|---|
 Edit Decal |
Opens the entry as a new editing session. Its layers, materials and effects become editable again. The current decal is left as it is |
 Move to Folder |
Moves the entry to another folder of the same library. Tick Create New Folder to make one first |
 Rename Asset |
Renames the entry and its folder on disk. It stays selected. Open projects and placed decals keep following it |
 Duplicate Asset |
Copies the whole entry (maps, editable sources and resources) under a new name, in the same folder. The copy becomes the selected entry |
 Delete Asset |
Deletes the entry and all its files from the disk, after asking |
 Add Images to Library |
Adds image-only decals from PNG maps (see below) |
 Export |
Opens the library export. See Export |
Existing names are always refused: nothing is overwritten by Rename, Duplicate or Move.
Delete cannot be undone
Deleting an entry removes its folder from the disk. Decals already placed keep their own copy of the data, and open edits stay available for Save As, but they stop following the entry. Duplicate the entry first if you want to keep a copy.
Save your work to the library
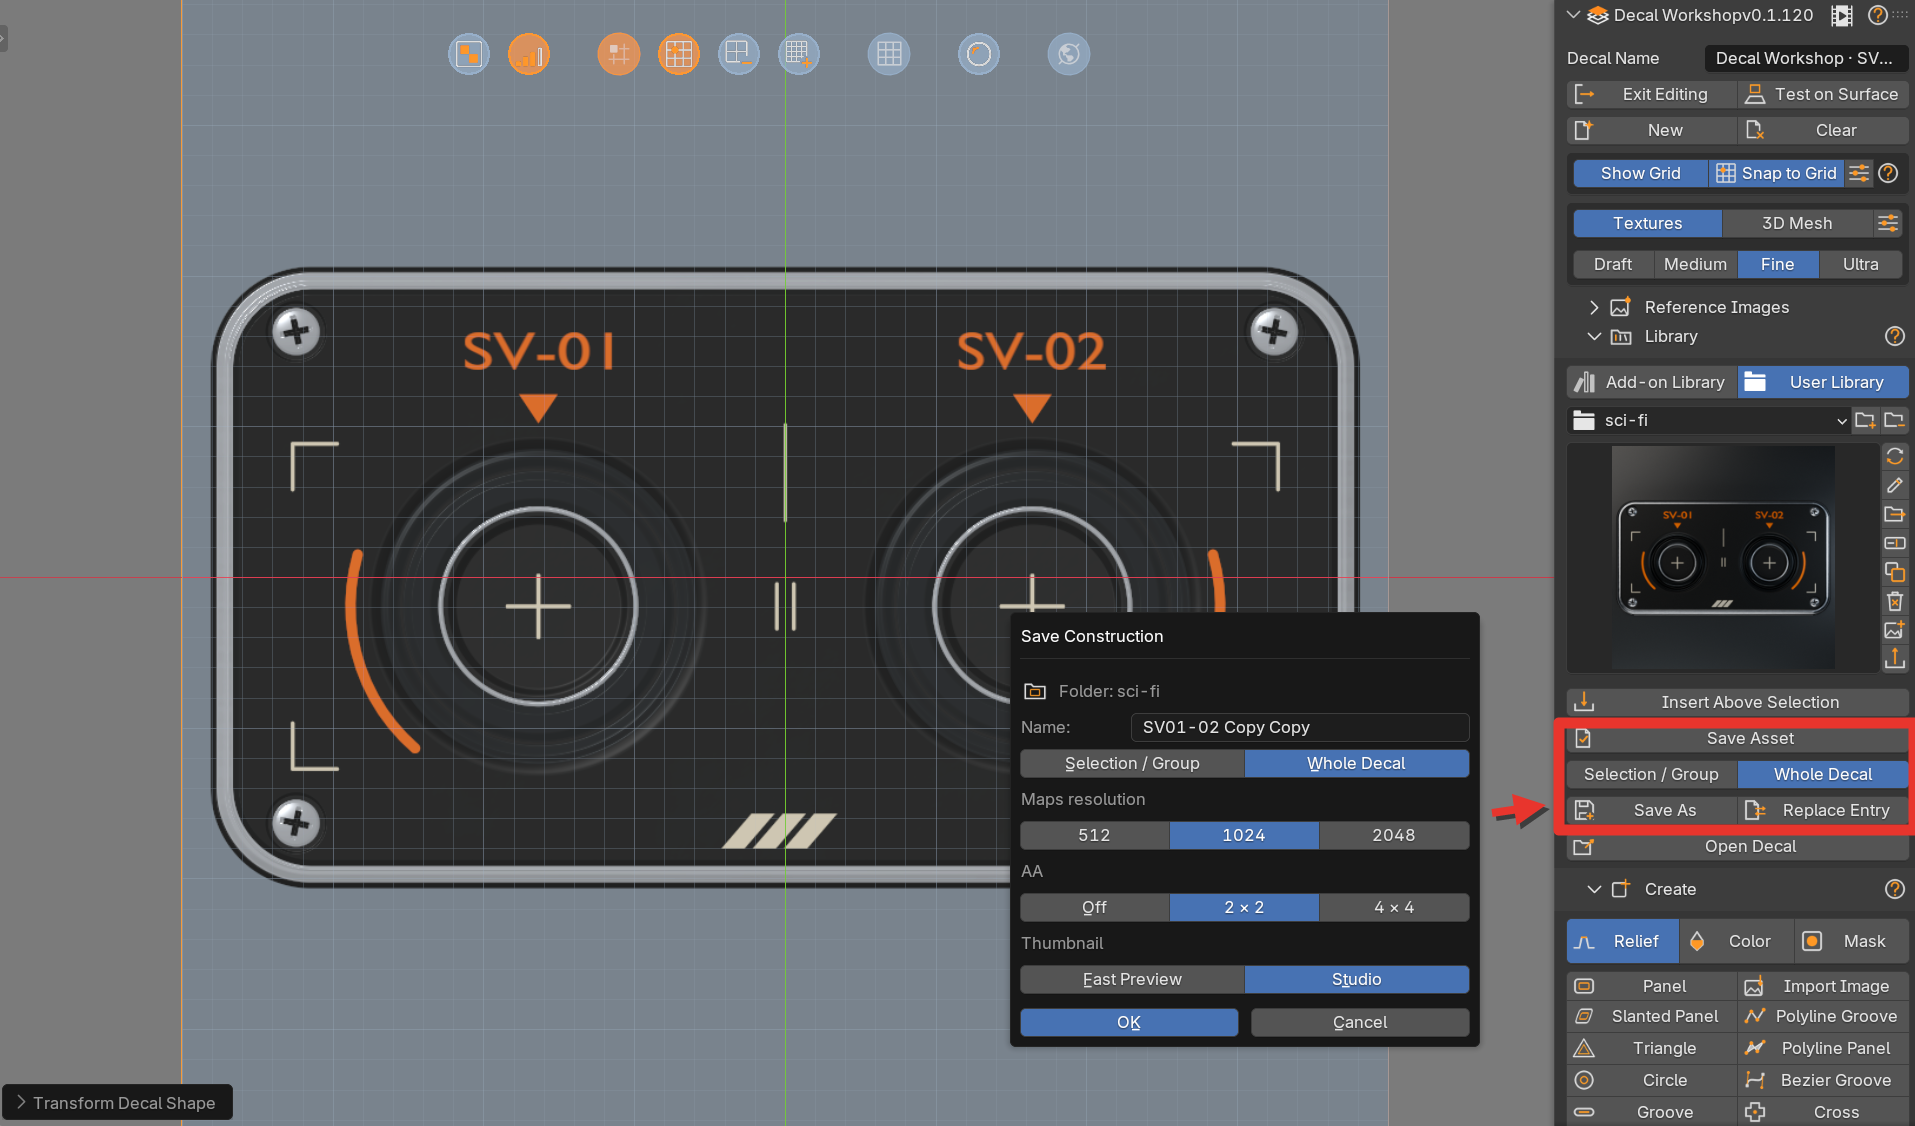
While editing, the Library block has the saving tools under the thumbnails.
| Button | What it does |
|---|---|
| Insert Above Selection | Adds an independent, editable copy of the chosen entry to your layers, above the active layer (or at the top of the group being edited) |
| Save Asset | Appears when you opened an entry with Edit Decal. Writes the whole decal back to that entry and regenerates its maps and thumbnail. The target stays that entry even if you browse another folder or library |
| Selection / Group or Whole Decal | Chooses what Save As and Replace Entry save |
| Save As | Saves a new entry in the browsed folder |
| Replace Entry | Overwrites the entry chosen in the thumbnail grid, after confirmation |
Save As
- Choose Whole Decal, or select shapes or a group and choose Selection / Group.
- Click Save As.
- In the dialog set the name, the maps resolution and AA, and the thumbnail type.
- Confirm.
The entry is written into the browsed folder with its maps, a thumbnail and its editable layers. A name that already exists is refused. Afterwards the new entry is selected and becomes the target of Save Asset. If you saved only a selection, that subset opens as its own project.
Include what a selection depends on
When you save a selection, include its masks, targets and clipping bases. A missing dependency is reported instead of silently dropped. Group modifiers that use their owner's center need all the members of that group.
Replace Entry
Replace Entry overwrites the entry you chose in the library with the current selection or whole decal. The entry keeps its name and folder, and the dialog asks for the resolution, AA and thumbnail type again.
Insert Above Selection
An inserted entry gets fresh internal identifiers, keeps the relative arrangement of its layers, and carries its modifiers, points and packed images and fonts. The library entry itself is never modified by an insertion. Image-only entries cannot be inserted, only placed.
Thumbnails: Fast Preview or Studio
The Thumbnail choice in the Save As and Replace Entry dialogs has two buttons.
| Type | How it is made |
|---|---|
| Fast Preview | The lit viewport preview, saved at once |
| Studio | A render in a separate Blender process, lit by a studio scene. It takes longer but gives a clean, consistent thumbnail |
The thumbnail is always a square 512 x 512 PNG. Studio uses your GPU when one is available, with a CPU fallback. If the studio render fails, the entry is still saved with its fast thumbnail and a warning appears. The default choice is set in the Preferences.
Editing the studio scene
The Studio thumbnail uses a Blender file called studio.blend in the add-on folder. It is read again at every save, so your changes apply at once.
- Open
studio.blendin a separate Blender window. - Change the lighting, the active camera, the world, the render engine (Cycles or Eevee), the samples or the color management.
- Save the file.
Keep these rules or the render fails:
- Keep exactly one mesh with the custom property
dw_thumbnail_subject(it is called Decal Preview at first). Its geometry and material are replaced by your decal, but its transform and modifiers stay. - Keep an active camera.
- Use Cycles or Eevee as the render engine.
The saved settings are respected, and the output is always a 512 x 512 PNG. A README text inside the file repeats these rules.
Keep a copy
An add-on update may replace studio.blend. Keep a copy of your edited file.
Image-only entries
Add Images to Library creates entries from plain images, without editable layers.
- Click Add Images to Library.
- Select the PNG maps of one or several decals, or a folder that holds their color, height, normal and mask maps. Files are matched by name.
- Confirm.
A thumbnail is rendered from the color map. These entries can be placed on a surface but not edited as shapes, so the Edit button is hidden for them. Placing them uses the same sticker behavior as Add Image as Decal.
Open Decal
Open Decal opens the decal.json of a decal folder as a new editing session, without touching your current scene. Keep the whole folder: the images and fonts it needs sit next to the file. Entries copied from one library folder to another can be opened this way too.
An exported bitmap alone cannot be edited. Only a folder that contains the editable layers can.
Moving a library
Entries are plain folders. To move an entry to another library, copy its complete folder into the other library folder and click Refresh.